Friday 13 September 2013

My new youtube video 


Fanfare intro to a forthcoming instrumental song called Athlete.
All melodic sounds are played with MonotrOndes. Expression control of the filter cutoff makes beautiful brass sounds!

It's shocking how similar my playing looks in those different windows. But if you look carefully you notice that every window is a different performance.
Those subtle differences in pitch and timing makes that beautiful ensemble sound.

Here is a link to an audio track on SoundCloud

Monday 19 August 2013

How to build MonotrOndes Part 3


Sorry, It's been a while since my last post! It was a warm summer here in Finland and I didn't have a summer holiday. So I enjoyed sunny evenings and weekends. But I have also improved the design of MonotrOndes.
Now the expression lever also controls the filter cutoff!


The Pulley System


Mitsushi Abe's Ondes Martenot MIDI Controller was the first design I came across that uses horizontal pulley system. This site gave me inspiration to build MonotrOndes that way too.
http://gam.boo.jp/blog/archives/2012/08/midi_1.html
I don't understand japanese but the pictures were very informative. :)

Horizontal version simplifies construction a lot.
Check out Mark Steiner's awesome Artemis that also uses horizontal system.
http://www.youtube.com/watch?v=fRdTDTK3QTQ


The Pulley System. Top left pulley is connected to the multiturn pot. The other pulleys have ball bearings to ensure fast action. The tension spring is very important part. 

I'm not going to tell every possible detail about the mechanical construction. There are many ways to build this kind of system. The basic idea is quite simple. It's more fun when people add their own personal touches. I bought my pulleys from finnish online hobby shop. I had to enlarge holes. I don't own a drill press so holes are not perfectly centered but it doesn't affect performance. In the near future I will resin cast my custom pulleys - topic for future blog post. :)
The string is fake leather cord - same type that jewellery hobbyist are using. The ring is keychain ring that fits to my finger. I knitted a little "padding" for the ring. I covered ugly knots with aluminum tape. :)
Dana Countryman used piece of pipe and velcro for the ring. I think it's a much better idea.
http://www.danacountryman.com/martenot_project/martenot3.html


The Ring.

You need a tension spring. I have an assorted spring set which I found from hardware store. I'm sure you'll find similar sets in your country.
When the Ring is in the middle of the keyboard the Tension Spring should also be in the middle.
Attach the Tension Spring first. It's a little challenging to tie the Ring - there should be a little tension in the spring when the Ring is in place.


The Ring and the Tension Spring in the middle of the keyboard.

The Keyboard


Technically it's not a keyboard. It's only a reference for finding a correct pitch. But let's call it keyboard anyways. :)
Many people have wondered why the keys gets narrower in the higher octaves. Monotron has linear to exponential conversion. But it’s not perfect 1 volt/octave. It's not designed to have pitch range of many octaves. If you want to make keyboard more even you will need extra circuitry.  I haven't tried this but I think you can use an anti-log trick.
http://www.geofex.com/article_folders/potsecrets/potscret.htm
 
I'm also a guitarist and I like the fact that the keyboard gets thinner in the higher octaves like frets in stringed instrument. I get more violin like vibrato and larger note range that way.  

When adjusting the pitch range and intonation use Monotron's own intonation trimmer and that trimmer pot I introduced in part 2. 
I have four and half octaves in my keyboard.
Lowest octave in my keyboard is 20 centimeters wide from C to C. fourth octave is less than 9 cm wide.
Multiturn pot is adjusted to be in the end of it's travel when the Ring is in the highest point of the keyboard. 

Here is how I did the keyboard overlay:
I adjusted pitch range first. Then I attached paper strip under the string and listened reference pitches from other instruments. I marked painstakingly every note. The paper strip as a reference I drawed stylised keyboard with Inkscape and printed it with a laser printer. I laminated both sides with clear contact paper. For those tactile pitch points I used scrapbooking stickers.

I wanted to keep keyboard overlay changeable. For example I might want to experiment with micro tonal scales. I used a piece of a picture frame and Velcro stickers as a way to keep keyboard in place.

Wednesday 19 June 2013

How to build MonotrOndes Part 2


Check out also the updated first part!

I'm using 3-pin DIN Connectors for connecting the Pitch Controller-module to Synth+expression-module of the MonotrOndes. I'm only using 2 pins and a ground point in this connector. You can choose a different type of connector. Or you can choose to make a non-modular version of MonotrOndes where everything is in fixed place without connectors and cables. But I have a point! The left-handed player can put the synth+expression-module on the right side of the pitch controller-module so he/she can play expression lever with his/her right hand. It's also nice to have a possibility to position the modules in a way that suits to your playing style.


 3-pin DIN Connector


 Here is an aluminum box that contains the multiturn pot. DIN connector at the top. 
Multiturn pot is connected to a pulley.

Here is the wiring inside the aluminum box. 


And here is the pitch control wiring inside the Synth+expression-module!


Stay tuned! :)

Thursday 6 June 2013

How to build MonotrOndes part 1


This post is updated!  

At first I have to give credit to my twin brother Kalle. He came up with the name MonotrOndes.
My video has been very popular. I thank you all for your nice comments!
Someone even asked if I could build and sell these things. Maybe if there is enough people willing to buy them. I don't even know if it's legal to sell modified synthesizers without permission from manufacturer like Korg.


Pitch Control Electronics 


I assume you know a little bit about electronics and components. You should also understand that if you mod your Monotron, you loose all warranty! So please be careful and don't blame me if something goes wrong.

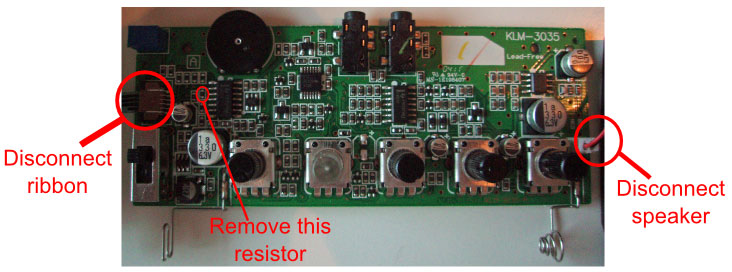
MonotrOndes is not using the original ribbon controller. There is a connector from the ribbon controller to Monotron board. You can disconnect the ribbon from there.

I removed one SMD resistor from Monotron's PCB. Instructions for removal and the location of that resistor are in this site: 
http://beatnic.jp/manuals/monotron-midi/midi-kit.html

Here is a new picture!

After removal of the ribbon and that SMD resistor I found out that monotron was playing continuously - exactly what I wanted. I don't know if it's necessary to remove that resistor. There might be an easier way to mod Monotron to play continuous sound.

For controlling pitch you will need two potentiometers - a trimmer (at least 47k) and a multiturn pot (100k). Of course you can use a normal potentiometer instead of a trimmer.
In the circuit the trimmer behaves as a variable resistor that sets the range of the pitch control. When you have found the right value for the pitch range you don't have to adjust it anymore. That's why we are using a trimmer type pot.

The multiturn pot's value changes when playing. Together the trimmer and the multiturn pot forms a voltage divider circuit. Monotron uses 3 volts to operate but there is internal circuit that magically (not really!) outputs 5 volts. The point in the Monotron PCB that outputs 5 volts is called VCC. That 5 volts is feeded to voltage divider that changes voltage value to smaller values. That divided voltage output is connected to pitch CV point in the Monotron PCB.

Now we have voltage controlled pitch!


I have to borrow unmodded Monotron for pictures. In the meantime check out this post from Din Sync blog. http://www.dinsync.info/2010/06/how-to-modify-korg-monotron.html

There you can find picture of unmodded Monotron PCB. The important solder points are Pitch, VCC, Ground terminal and positive terminal.

You can see the important solder points in this new picture! Check out also a secret audio output point that bypasses Monotron's own volume pot. :)


Here is a schematic


Here is a picture of I/O connections



Saturday 1 June 2013

HELLO WORLD!

  Welcome to Electronic Melodist!


This is a blog planned to be mostly about my DIY musical instrument projects and music production related things. I think the most enjoyable synth demo videos on Youtube are the ones where music sounds like proper musical piece. So I will not make videos that sounds like drone music or synth noise.

I'm from Finland. My English will not be perfect - sorry about grammar and spelling mistakes! :)

Above is the first picture of MonotrOndes - Korg Monotron that I hacked into
Ondes Martenot-style musical instrument. More pictures and info coming soon...

And here is a video that probably brought you here. :)

- Ville Aho -